예제 1) 탭 레이아웃 구성하기

XML 소스
<?xml version="1.0" encoding="utf-8"?>
<androidx.constraintlayout.widget.ConstraintLayout
    xmlns:android="http://schemas.android.com/apk/res/android"
    xmlns:app="http://schemas.android.com/apk/res-auto"
    xmlns:tools="http://schemas.android.com/tools"
    android:id="@+id/main"
    android:layout_width="match_parent"
    android:layout_height="match_parent"
    tools:context=".MainActivity">

    <TabHost
        android:id="@+id/tabhost"
        android:layout_width="match_parent"
        android:layout_height="match_parent"
        tools:layout_editor_absoluteX="110dp"
        tools:layout_editor_absoluteY="159dp">

        <LinearLayout
            android:layout_width="match_parent"
            android:layout_height="match_parent"
            android:orientation="vertical">

            <TabWidget
                android:id="@android:id/tabs"
                android:layout_width="match_parent"
                android:layout_height="wrap_content" />

            <FrameLayout
                android:id="@android:id/tabcontent"
                android:layout_width="match_parent"
                android:layout_height="match_parent">

                <LinearLayout
                    android:id="@+id/tab1"
                    android:layout_width="match_parent"
                    android:layout_height="match_parent"
                    android:orientation="vertical">

                    <TextView
                        android:id="@+id/textView"
                        android:layout_width="wrap_content"
                        android:layout_height="wrap_content"
                        android:text="This is the Artists Tab" />
                </LinearLayout>

                <LinearLayout
                    android:id="@+id/tab2"
                    android:layout_width="match_parent"
                    android:layout_height="match_parent"
                    android:orientation="vertical">

                    <TextView
                        android:id="@+id/textView2"
                        android:layout_width="match_parent"
                        android:layout_height="wrap_content"
                        android:text="This is the Albums Tab" />
                </LinearLayout>

                <LinearLayout
                    android:id="@+id/tab3"
                    android:layout_width="match_parent"
                    android:layout_height="match_parent"
                    android:orientation="vertical">

                    <TextView
                        android:id="@+id/textView3"
                        android:layout_width="match_parent"
                        android:layout_height="wrap_content"
                        android:text="This is the Songs Tab" />
                </LinearLayout>
            </FrameLayout>
        </LinearLayout>
    </TabHost>
</androidx.constraintlayout.widget.ConstraintLayout>
Java 코드
package com.inhatc.mobile_programming_practice;

import android.graphics.Color;
import android.os.Bundle;
import android.view.Gravity;
import android.widget.TabHost;
import android.widget.TextView;

import androidx.activity.EdgeToEdge;
import androidx.appcompat.app.AppCompatActivity;
import androidx.core.graphics.Insets;
import androidx.core.view.ViewCompat;
import androidx.core.view.WindowInsetsCompat;

public class MainActivity extends AppCompatActivity {
    TabHost myTabHost = null;
    TabHost.TabSpec myTabSpec;
    @Override
    protected void onCreate(Bundle savedInstanceState) {
        super.onCreate(savedInstanceState);
        EdgeToEdge.enable(this);
        setContentView(R.layout.activity_main);

        myTabHost = (TabHost)findViewById(R.id.tabhost);
        myTabHost.setup();

        myTabSpec = myTabHost.newTabSpec("Artists")
                        .setIndicator("Artists")
                        .setContent(R.id.tab1);
        myTabHost.addTab(myTabSpec);

        myTabSpec = myTabHost.newTabSpec("Albums")
                        .setIndicator("Albums")
                                .setContent(R.id.tab2);
        myTabHost.addTab(myTabSpec);

        myTabSpec = myTabHost.newTabSpec("Songs")
                        .setIndicator("Songs")
                                .setContent(R.id.tab3);
        myTabHost.addTab(myTabSpec);

        myTabHost.setCurrentTab(0);

        ViewCompat.setOnApplyWindowInsetsListener(findViewById(R.id.main), (v, insets) -> {
            Insets systemBars = insets.getInsets(WindowInsetsCompat.Type.systemBars());
            v.setPadding(systemBars.left, systemBars.top, systemBars.right, systemBars.bottom);
            return insets;
        });
    }
}
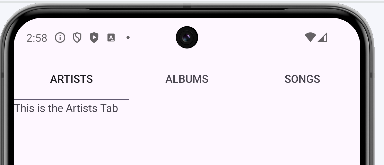
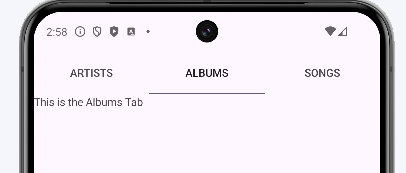
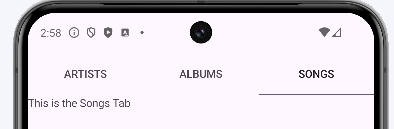
결과
주요 포인트
Java 를 이용한 tab 요소 추가 :
TabSpec = TabHost.newTabSpec("탭 명").setIndicator("탭 명").setContent(R.id.탭 id);
TabHost.addTab(TabSpec);
예제2) 탭 요소의 색 변경

Java 코드
package com.inhatc.mobile_programming_practice;

import android.graphics.Color;
import android.os.Bundle;
import android.view.Gravity;
import android.widget.TabHost;
import android.widget.TextView;

import androidx.activity.EdgeToEdge;
import androidx.appcompat.app.AppCompatActivity;
import androidx.core.graphics.Insets;
import androidx.core.view.ViewCompat;
import androidx.core.view.WindowInsetsCompat;

public class MainActivity extends AppCompatActivity {
    TabHost myTabHost = null;
    TabHost.TabSpec myTabSpec;
    @Override
    protected void onCreate(Bundle savedInstanceState) {
        super.onCreate(savedInstanceState);
        EdgeToEdge.enable(this);
        setContentView(R.layout.activity_main);

        myTabHost = (TabHost)findViewById(R.id.tabhost);
        myTabHost.setup();

        myTabSpec = myTabHost.newTabSpec("Artists")
                        .setIndicator("Artists")
                        .setContent(R.id.tab1);
        myTabHost.addTab(myTabSpec);

        myTabSpec = myTabHost.newTabSpec("Albums")
                        .setIndicator("Albums")
                                .setContent(R.id.tab2);
        myTabHost.addTab(myTabSpec);

        myTabSpec = myTabHost.newTabSpec("Songs")
                        .setIndicator("Songs")
                                .setContent(R.id.tab3);
        myTabHost.addTab(myTabSpec);

        myTabHost.setCurrentTab(0);

        myTabHost.getTabWidget().getChildAt(0).setBackgroundColor(Color.RED);
        myTabHost.getTabWidget().getChildAt(1).setBackgroundColor(Color.GREEN);
        myTabHost.getTabWidget().getChildAt(2).setBackgroundColor(Color.BLUE);

        for (int i = 0; i < myTabHost.getChildCount(); i++)
        {
            myTabHost.getTabWidget().getChildAt(i).getLayoutParams().height=150;
        }

        ViewCompat.setOnApplyWindowInsetsListener(findViewById(R.id.main), (v, insets) -> {
            Insets systemBars = insets.getInsets(WindowInsetsCompat.Type.systemBars());
            v.setPadding(systemBars.left, systemBars.top, systemBars.right, systemBars.bottom);
            return insets;
        });
    }
}
결과

주요 포인트
Java 를 이용한 tab 요소 속성 변경
TabHost.getTabWidget().getChildAt(index)
tab배경 색 변경
TabHost.getTabWidget().getCihldAt(index).setBackgroundColor(Color.BLUE);
tab높이 지정
TabHost.getTabWidget().getChildAt(index).getLayoutParams().height = 150;
'모바일 프로그래밍 공부' 카테고리의 다른 글
| 모바일 프로그래밍 7주차 Graphic 2D (0) | 2025.04.14 |
|---|---|
| 모바일 프로그래밍 6주차 ( Intent ) (0) | 2025.04.09 |
| 모바일 프로그래밍 5주차 EventHandler (0) | 2025.04.01 |
| 모바일 프로그래밍 3주차 (0) | 2025.03.24 |
| 모바일 프로그래밍 1주차 (0) | 2025.03.17 |